Sometime this month a Facebook post asked about methods for attaching corks to carved bottle stoppers. I didn’t comment because, as you will see, a simple reply would not provide all the details some people would like. This post will describe my method, which is far from the only way to make a bottle stopper. You can also purchase pre-drilled corks with dowels from carving supply vendors.
I use #8 corks. These are 1 1/8 inches long with the top being 7/8 of an inch in diameter and the bottom 3/4 of an inch in diameter. I visit the local wine-making supply store to buy them. There are many sizes to choose from. Here you can buy them by the piece so you can choose the ones you like. Avoid corks with cracks, large openings or missing sections. You can find corks at hobby stores but they will be more expensive and packaged in assorted sizes. The ones I’ve seen in hobby stores are usually in good condition so if you only need a couple, that might be the way to go.

Block in drilling position.
I have a drill press and recommend using one for drilling corks. I learned the hard way that you should not hold a cork by hand when drilling. Using a woodworking clamp to hold a cork will compress the sides unequally and cause the hole to be distorted. I made a simple holding devise that will minimize pressure and not apply pressure unequally. Remember mine is for #8 corks but you can modify the dimensions if you use another size. I cut a block of wood 2 inches by 2 inches and about 2 and 3/8 inches long. Basswood scraps are great for this. Locate the center of the top and bottom surfaces of the block. Secure the block in a clamp for drilling a 13/16 inch hole in the center of the top. The hole should be 1 inch deep. I used a Forstner bit to keep it neat. Mark that end so you know it’s the top. If you’re going to use more than one size cork, mark this end with “#8”.
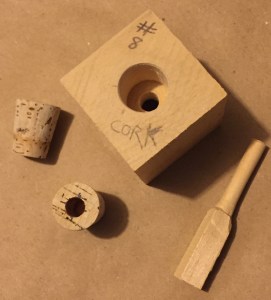
Block, push stick and corks.

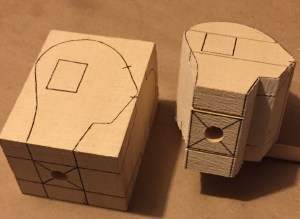
Brad-point bit on left. Forstner bit on right.
At the center point on the bottom end, drill a 13/16 hole 3/4 of an inch deep. If you plan to use a second sized cork, change the drill size for the bottom hole. Experiment to determine the size. Mark that end with the cork size. Don’t worry about the alignment of the top and bottom holes they shouldn’t meet anyway. To create a passage between the top and bottom holes, switch to a 3/8 inch drill bit. The bottom of each of the larger holes will have a mark for the center left by the bit. Drill the passage hole at that mark.
I smoothed the sharp edge of the top hole so it doesn’t leave a mark on the cork. Test fit the cork. It should fit snugly in the top hole. If the cork is wedged tightly in the hole, there probably won’t be enough cork to protruding to work it loose. Now it will become clear for the need of the passage hole. I whittled a scrap to look like a dowel with a handle so I could push the cork free. It should be a loose fit in the 3/8 passage hole, just don’t put a sharp point on the end.
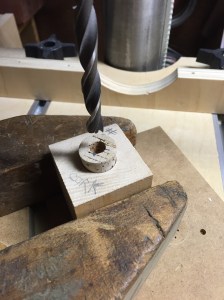
Cork in drilling position.
To prepare the cork for drilling, locate the center of the top surface. There are several tools made for finding the center of a dowel or cut a paper template. Secure the cork in the block. Make sure the top of the cork is parallel to the bottom of the block. Hold the block with a clamp and position a 3/8 inch brad-point drill bit at the center point of the cork. Slowly drill into the cork. It’s been my experience that drilling fast tears the cork. I like to drill this hole 5/8 of an inch deep. I use a 3/8 inch hardwood dowel to connect the cork to the carving. The length of the dowel should be slightly shorter than the combined depths of the holes in the cork and the carving. This allows space for glue trapped at the ends of the dowel.
As for the hole in the carving, my advice is to drill it before the carving is shaped. If you’re using a rough-out or a completed carving that has no hole, the drilling will be trickier. I would discourage holding the wood in your hand when drilling. Find a soft material or two sandbags, something that would conform to the carved shape. When held with a clamp, it should immobilize the carving for drilling. You will have to do your best to adjust the carving so the hole will be perpendicular to the surface that will meet the cork.
I test-fit the cork, dowel and carving before using glue. I use a two-part epoxy. Oh, don’t glue the cork before you carve your masterpiece.