Golf ball brands and models I prefer

I have kept a list of my favorite brands and models within those brands. There are many more brands and models that are enjoyable to carve but be aware there are models that are not “2 piece” construction. They are made with multiple covers, multiple layers and of course the wound rubber band.  Since I lean toward the Titlest brand, I keep a list of Titlest models I avoid. They resist even the sharpest tools or have rubber bands. I’ve included them in the “Not Acceptable” category at the bottom.

An acquaintance named Tom Rhodes has a book that will provide inspiration for thinking inside AND outside the ball. The book also has an extensive list of ball characteristics for hundreds of balls.

Acceptable

    Titlest:

HP Tour
HP2 Tour
HP and a number
DT Distance
DT 2 Piece
HVC and a number
HVC Tour
HVC Distance
HVC Distance-L
HVC Soft Feel
HVC Spin

    Topflite:

Tour Edition
Tour-SD90
Infinity Awesome Distance
Infinity Absolutely Straight
XL2000 Exceptional Spin
XL2000 Super Titanium
XL3000 Super Feel

    MAXFLI:

Noodle Long and Soft

    Pinnacle:

Gold
Gold Spin
Gold Velocity
Gold – FX Long
Gold – FX Soft
Equalizer
Extreme
Performance
Power 392
392 LS
Pinnacle 90
332
384 90 Compression
Distance LS

Not Acceptable

    Titlest:

Anything with titanium
Tour Prestige
Tour Distance
Tour Distance SF
HP2 Distance
HP Distance
HP Eclipse
Pro V 1
Pro V 1*
DT So/Lo
DT Spin
Professional
DT and a number
NXT Tour
NXT Distance
Anything with “wound”

Drawing a Center Line on a Golf Ball

A tip to establish a center line starts back when the ball is placed in the template. (See the post on Opening a Golf Ball) The cardboard is positioned perpendicular to the brand name printed on the ball with one complete brand name showing on each side of the template. Notice the pencil line on the template to aid in positioning the brand name. After the cover has been removed, it’s easy to continue the imaginary brand line around to the exposed rubber.

Small reference mark.

I make a small reference line on the rubber to indicate the middle of the brand line on both (and opposite) sides. (Click on image to enlarge.)

Compass point on reference mark. Pen near middle of rubber.

Adjust a compass, that uses an ink pen, so it reaches from one cover edge where you just made a reference mark to your best guess at the center. Make a small mark there.

Using the second reference mark to locate the middle of the rubber.

Without adjusting it, move the compass to the reference mark on the other side and check to see how good your center guess was. If you are lucky, or just very good at guessing, the pen will land on the first center mark.

Compass adjusted to make first center line.

Otherwise, adjust the compass to split the difference between the two center measurements and draw a complete line from “top” to “bottom” on the rubber.

Line drawn from second reference mark.

It’s important to reposition the compass at the other reference mark and draw a “top” to “bottom” line from that side, too. Rarely do the two lines match perfectly but you now have a center reference.

Opening a Golf Ball

I remove the cover as follows. (Click on the picture to enlarge.)

Cardboard template used to draw line on ball.

I made a cardboard template with a hole cut slightly smaller than the diameter of a standard ball. I position the ball in the hole so there is just a slight bit more cover on one side of the cardboard. I use a ballpoint pen to mark the ball tracing the template. I clamp the ball in a vise having a jaw used for holding pipe or bicycle frames. I cut along the line with an Xacto saw. Forty-two teeth per inch.

Sawing on the line while ball is in the vise.

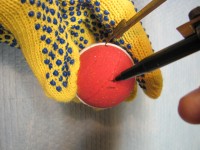
After the line has been cut, I use small screwdrivers to remove the cover. It is very important that you wear a glove to hold the ball while you work with the screwdrivers. I force one screwdriver into the cut and under the smaller side of the cover. That allows room to place a second screwdriver next to the first one.

Inserting the second screw driver under the cover.

Try to keep the screw drivers perpendicular to the cut to reduce the risk of slipping and stabbing your hand. Remove the first one and insert it on the other side of the second, alternating this way, each one reaches further under, until the cover pops off. I normally keep the loose cover with the ball.

Cover is breaking free.